Pages

Tuesday, June 25, 2013

2nd Birthday Cupcake

Good Morning Cyber Friends,
Today's card is the one I made for my only granddaughter, so I HAD to do it in pinks.....its my one chance to do girly!  I decided back in Florida some of the details and punched out a Martha Stewart butterflies edge punch from glossy white paper.  Also decided that I wanted to make an easel card.  Then a friend from my online stamping group was showing us how to use peel off stickers on sticker paper and she had an extra sheet of cupcakes......perfect.  Brought all of it here and this is the result.
Card closed

Found some cute pink flowered paper at Michael's and layered it onto pink card stock, then used a corner rounder punch.  Inked the edges of both papers.   The "happy birthday" is from a different sticker pack which is placed on a strip of pink with inked edges.  Two small punched butterflies with little jewels for bodies were added.


Above is the Happy Birthday sticker from Stampendous called Class A' Peel.


Glittery Cupcake CloseUp
The best part of any birthday party is the cake, right?  This one is yummy looking with all of its glittery goodness.  The black outline sticker was put onto 2-1/2 inch double sided Terr-ific Tape from Sparkle N Sprinkle (SNS).  Next, pour on the Cloud Nine Velvet Glitter, rub it in and shake off the excess.  Now use your Copic markers to color it in over the glitter.  SNS has a tutorial on its website showing how to do this Velvet Glitter technique here.  This cupcake only had one candle, but my granddaughter was two, so I added another from the sticker page before glittering.  When done coloring, remove the other protective layer from the tape and apply to some heavier weight paper; then cut around edges.  I used another one of those action wobble springs to attach the cupcake to the front of the card (see my  last post for the Car Card).  Isn't it shiny??


This is the cupcake sticker from Elisabeth Craft.  The "white" one is what was left after I removed the actual sticker.  You can see one candle sticker on the lower right that I also used.  There are 4 more cupcakes here to use, plus another one that is missing (I have glittered it and it is ready to use), so you get 6 cupcakes on one sheet.  Can you see that there are some smaller stickers that can be used as well?


Easel Card Open
Here is the card open.  The butterfly was used to hold the card open. A Sakura glaze pen was used to write the sentiment on the banner, and the area that cannot be seen here is for signing.  

Popped Up Butterfly

Here is a close up of the butterfly.  The punched out butterfly was glued onto a piece of acetate, cut out and then glitter was added with glue.
I was really happy with how it turned out and since she is only two, she will probably just love the wiggly cupcake, but her mom saves all of my cards, so maybe one day she will look at it and think of me!

I will be entering my card into the following challenges:
Catered CropPunches and dies
Hobby Cutz - Challenge 9 - anything with H (Happy Birthday)
ABC Challenge - P for Pretty In Pink
ALBC - Something Sweet (cupcake)
Animal Friends - Butterfly or Bugs (butterflies)

Hope you have a wonderful day and thank you so much for spending some time with me.
Cheesy Sandy


Wednesday, June 19, 2013

My Grandson Loves Cars -- Here's a CAS Card

My grandson has loved cars since ....forever!  Well he just turned 5, but he has played with hot wheels since he could pick one up.  And Disney's "Cars"!!!!  Well, he LOVES it.  I have done the Disney thing, so this year it had to have a little 'different' take on the same old theme.  LOL  And since he now lives in Canada it takes forever for mail to get there, so I also am going 'different' for me with more of a CAS card.  Oh boy!

So what to do with a car?  I had heard about a "wobbly" thing that makes an item jiggle around.  And I have a friend who tried making one (and she said it took way to long to get it right).  Well I found the thing at a chain store here in Illinois called Archivers.


They come in a pack of 6 and it has a plastic concentric circle that has sticker paper attached on both sides.  Very easy to use.  For my purposes, I has to cut down the stickers because my image was small.

I had purchased a clear stamp set at Michael's just for this occasion (sorry I do not remember who the set is by, but when I get back to Florida I can let you know if you would like to email me).  The set comes with the checkerboard and all that you see here.   I stamped the car two times and fussy cut one of the images to pop up and wobble.  For the fire, I used a marker to ink that part of the image.   And that's it!  Clean and simple, right?  Oh yeah, the wobble.  All I had to do was cut the adhesive area smaller to fit the car and there you have it.


Above is a close-up of the car.  I hope my sweetie-pie grandson likes it as much as I do.
Happy Birthday!

I will be entering this card into the following challenges:
Art Impressions - Challenge 112, masculine cards
PolkadoodlesChallenge 24, male
Crafting For All Seasons - Challenge 54, one for the guys
Sisterhood of Crafters - Challenge, Its all about the boys
Crazy Amigos - Mens card Challenge

Thank you for taking the time to stop by today.  Hope it is a wonderful day for you.
Cheesy Sandy

Monday, June 17, 2013

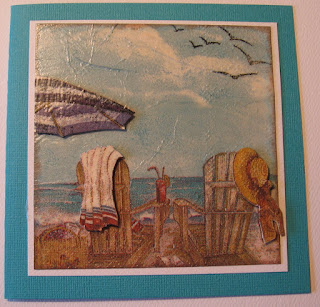
Napkins and ModPodge

One of the first ways I learned to use napkins on cards was to use ModPodge.  It is a really easy technique, but does require some drying time.  I have never tried heating them with an embossing gun to speed up drying, so if you have tried it, let me know how it works!

I chose this napkin because it reminds me of where I'd like to be every day -- relaxing on the beach. I only can hope that it gives my friend a warm fuzzy!  And here is the card I made for my long time friend's birthday (Germaine).


Begin by separating the napkin layers until you have only the top, colored layer.  Apply ModPodge over a piece of cardstock with a brush, then place the napkin with color side up and spread ModPodge over the napkin. (I used a sponge brush--really cheap).  When it is all covered, set aside to dry.  Be sure that you have 2 of the same images on your napkin piece, or else do two napkins.  That way you will have images to pop up.  And don't worry about wrinkles in the paper......it really looks neat that way.


After the pieces are dry, simply cut to the desired size, ink the edges, mat onto another piece of cardstock and tape to the card front.  Then cut out some of the smaller images to raise up with pop dots.  The modpodge really makes the napkin stiff and easy to pop.

You will have lots of fun finding beautiful napkin scenes for your cards.  I look after holidays when they go on sale.  Or use coupons!  

Hope you like this technique and try it out.  It is addictive! 

I am entering this card into the following
ABC Challenges - ABC33 'Summer'
Created with Love Challenges - CWLC#46 Favorite Things (summer & the beach)
Kaboodle Doodles Challenges  - #176 Summer
Make It Monday - #145 Anything Goes
Sister Act Card Challenge - #11 Anything Goes (must be a card)

Thank you for spending some time with me today.
Cheesy Sandy


Monday, June 10, 2013

SYMPATHY IN BLACK AND WHITE


What are the hardest cards to make?  In my opinion, it is a sympathy card.  Having to make a few recently,I think it is even harder when you do NOT want it to have any religious tones.  Went looking for some appropriate paper Black and White)and found some Black and Silver that I thought would work at a local big box store. 

I came across the Card Crafter's Circle challenge blog and they are having a sketch challenge similar to what I had in mind....


 and thus the card materialized:

Finished size is 5 X 7

My old standby for a sympathy card uses a die cut bird that I call a dove, however I don't have one laying around and no die cut machine, so I found these dove brads and some floral embellishments that look like lilies to me.  Also looking in the dollar bins, I found some great black and white ribbons to add.

Dollar bin finds


The ribbon is sheer and I think really beautiful. It is adhered to a piece of white cardstock and layered onto black.
 

Here it is just added to the inside of the card directly onto the white cardstock.
Heartfelt Creations sentiment


The brads were plain white, so a little glue was added to the wings along with some white art glitter.


While I was at it, I made a few more in A2 size.  One for a birthday and 2 more to have on hand.  I also made one into a thank you (not pictured).  I apologize for the quality of the picture--it was at night.


ABC Challenge - O for Open
Card Crafter's Circle - Challenge #78 Feeling Sketchy
Crafty Sentiments Designs - Black, white and one other color (silver)
Sentimental Sundays - Challenge #158 Metal Findings (doves)
Creative Moments - Challenge #18 Lots of Layers
The Hobby House - Challenge #1 Anything Goes
Make It Monday - MIM #144b with Nicecrane Designs (b) - Anything Goes

That's it for now.  I am a little behind getting this posted.  Worked all day in the yard yesterday and my body is really feeling it.  My hands are so stiff it is hard to type!  LOL.  Until the next time.........happy stamping!
Cheesy Sandy  

Friday, June 7, 2013

LEFTOVERS

Hello Bloggers,

As I told you last time, I do not have many supplies with me this summer so I brought some "leftovers" with me to use up.  Here is another card using some leftover pieces:
Toni's birthday
 
I had some glossy cardstock that was dry embossed with an embossing folder.  I used a brayer to roll ink from the Kaleidacolor rainbow ink pad called Spectrum.  Love this look which I learned from my former design teammate, Shona.  Cut to desired size and layered it on white paper.  After that it was simple!  I added the white ribbon with a thinner apple green ribbon to the middle, plus 3 half pearls.

The flowers??  Those are dollar store sticker finds!!!   (Thanks to my Florida friend, Gloria.) Yep, they are dimensional and really pretty.    And you get quite a few for $1.  What do you think????


Added a couple of the smaller stickers to the inside sentiment (Heartfelt Creations).  The writing uses a Sakura Glaze pen (these give a pretty color and sheen along with a little dimension).  Will probably be using these more this summer since I am without most of my stamps.  LOL.


Hope that this has given you some ideas!

Entering this card into the following challenges:

Challenges4Everybody - Challenge 21 - Anything Goes
Make My Monday - Use lace and/or ribbon
Inspire me Friday 106 - Anything Goes
Creative Moments - Challenge 18 - Lots of layers
Totally Gorjuss - Challenge 186 - Anything goes with flowers
TTCRD - June 4 - 10 Challenge - Anything Goes

See you next time.  It has stopped raining, so I am going to try to go and plant some of my own flowers to enjoy.

Cheesy Sandy